

Saturday, April 26, 2014
Round DIY Stick Mirror
For this project I used 14" shims from a local home improvement store that I lightly sanded and painted black. I then hot glued them to the back of the mirror. I started with the 12 o'clock and moved to three, six, and then nine o'clock spots. I glued the thin end of the shim to the mirror. For the rest of the shims I just glued them evenly one layer at a time. I tried to hot glue a picture hanger to the back of the mirror, but it kept falling off the wall. I had to re-glue some of the shims after it falling off the wall. So I decided to forego the picture hanger and just hang it on the wall without one. I would take a picture of the back of it for you, but this one was hard to get on the wall and won't come down for a while.
Framed Burlap
My mantle is a work-n-progress. I've had a black empty frame just leaned up against the wall for weeks.......well months!! I just can't decide on how to decorate it. I am on a tight budget and want it to look like I'm on a I have all the money in the world budget!! Ha Ha Ha Ha yea right I know.........that will never happen!! All in all it doesn't matter whether it looks like I've spent $20 or $200 on it I want to LOVE it!! And well right now.......I'm not LOVING it......I'm just liking it!
As I was lying in bed the other night with my mind running through the days course and jumping around to a new thought before the last one was even finished. Can anyone say ADD?!?!?! I can!!! This idea came to me. I already had the frame (I purchased from Hobby Lobby a long time ago for half off) and the "S". The frame measures 24x36, so I purchased a yard of burlap from Hobby Lobby. I cut a piece of cardboard to fit the opening of the frame from all the extra boxes I have in the basement from our move. I cut the burlap about 1 1/2" larger on all sides of the cardboard. I folded the excess burlap over the back of the cardboard and secured it with hot glue.
I painted the "S" black and cut some red ribbon. I put the burlap covered cardboard in the opening of the frame. I know that you have seen on some frames what looks like staples that you can bend to remove the back of the frame. Well I decided I would use my staple gun in the same way to hold my burlap covered cardboard in my frame. It worked! Now I don't think that I could bend them back and forth like in other frames. I plan on just taking them out and replacing them in the future, if I want to change out what is in the frame.

Finished DIY dresser to TV Stand
Here is my new TV Stand. If you remember from a previous post <here> I purchased this dresser from my local Good Will for $45. After purchasing the other items I needed I've only got approximately $75 in my new huge, solid wood, heavy TV stand.


Stealth Jet is the color I decided to go with. The picture on the right is to show you the difference. You can see where I used the Deglosser and I didn't. This is after 4 applications of the Deglosser. I was amazed how well this product worked. My husband came home from work and thought I had sanded it. After 4 applications of the Deglosser to the whole dresser and drawers dried Iapplied two coats of paint.

After
Here is what the dresser looked like when I brought it home. The middle drawer and door are covered in leather. I wasn't sure if I could use the Deglosser and paint on it. I decided that if it didn't work I would just not put them back on. There is a shelf behind the door and I thought I would use some baskets there. There wasn't any issues with the leather.
Before
Here is what I used to get this project done!! After a trip to my local Home Depot and some advise from an Associate I decided to go with the Deglosser instead of sanding. With the help of some good tunes from my smart phone I got this done!!
Stealth Jet is the color I decided to go with. The picture on the right is to show you the difference. You can see where I used the Deglosser and I didn't. This is after 4 applications of the Deglosser. I was amazed how well this product worked. My husband came home from work and thought I had sanded it. After 4 applications of the Deglosser to the whole dresser and drawers dried Iapplied two coats of paint.
DIY Bathroom Sign
Check out the sign I made for my half bathroom. I really wish that "Jesus" had been larger, but that will be a fix for another time. I used a piece of wood I had left over from another project. I think this piece measures 3'w x 2'h.

I wanted it to be a golden mustardy yellow color. So I mixed yellow and white until I got the color I was looking for. I painted the board and after it dried I sanded it with sandpaper to give it a aged type of look. I used my handy dandy Photoshop to type up what I wanted my sign to say and printed it out.
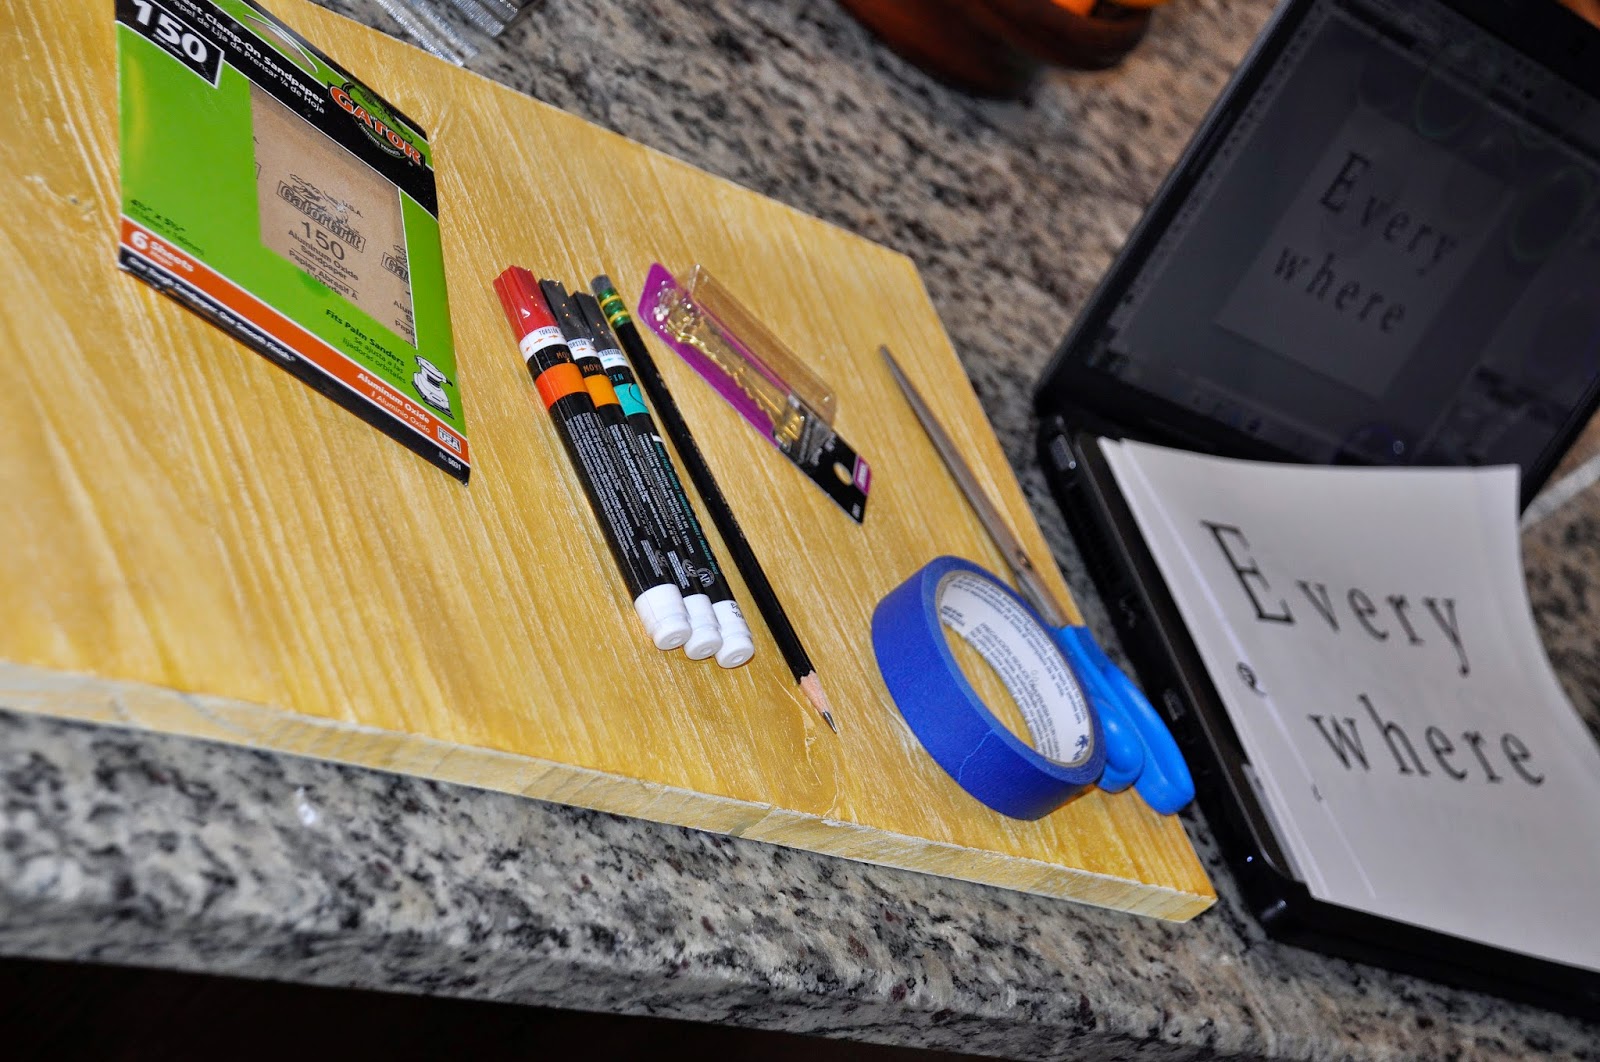
This is what it looked like after I sanded it.

I cut out each of the words and placed them on the board where I wanted them. It looked good to me, so I proceeded on with the project. The ole saying high-n-sight is 20/20 is sooooo true! I wish that I would have went with a larger font! That's another fix for another time. I like it for now.

Here was the tiring part for me. Turn each word over and color over each letter with a pencil. My hand got soooo tired! Be prepared sharpen your pencil several times.

After coloring the back side of the words place them back on the board where you want them and tape them down. I used painters tape. Take your pencil and trace the letters.

This is what it will look like after you trace overs the letters. I used a thin lined paint marker to paint the boarders and then a thicker lined paint marker to fill in the letters.

Monday, January 13, 2014
Up coming projects !!
Here are a couple of projects that I will be working in the next few weeks. Both are Goodwill finds.
I was so excited when I found this dresser. Ok, so I didn't know how it how it worked.....the sales tag was tapped to the top of the dresser. I took the tag to the nice lady at the register. She asked if I had the bottom half of the tag and I said no, that was how I found it. She said that someone else must have the bottom half of the tag. She had to overhead page three times for that person to come to the front with the tag or the item would be sold. She paged three times and yippee skippee to me it was all mine for $39.95 !! A good deal I think, it is solid wood with some minor scratches. I plan on refinishing it and using it as a TV stand. I will post before and after pics with instructions of how I did it when I'm all finished.

Here are three Eddie Bauer picture frames that I found at the Goodwill. As you can see from the price tag, originally it was $19.99 and I got it for $2.99 !! I haven't decided on what I'm going to do to these yet, but I'll post before and after when I do. Just post a comment if you have any suggestions.

Sunday, January 12, 2014
$100 Solid Wood Headboard
This is a project we did a few months back. My son was sleeping in our bed and said he didn't want to sleep in his twin bed because it was too small. We had a queen bed on a metal frame in the spare bedroom, so he decided he wanted to sleep in that room. So as a mother.....who was wanting her bed back.....was willing to do whatever it took to make it happen. I saw a pin on Pinterest of a headboard with lamps. I loved it and set out to make one of my own. My husband and I took a trip to Lowes and priced different options. The pin on Pinterest looked like fence panels, but that turned out to be a little more than what we wanted to pay. I am saying that this cost us approximately $100. Here is what we purchased:
(1) 36" Flat Panel interior door for around $25
(1) 3/4 x 3 1/2 x 63 (top)for around $2
(4) 2x4x6 (sides) for around $2 each
(2) Lamps for around $25 each
Stain
Brushes
Sandpaper
Screws for assembly and to attach headboard to bed frame
Here is the finished Headboard! I know that the Chevron may be a little girly for a boy, but at the time I was making it I didn't think it would be. My nephew now sleeps in this bed, the twin bed was too small for him. We have since sold the twin bed and got my son a full size bed. Eventually I will change out the bedding for something a little more manly.

This is what it looked like after assembly and after I started putting stain on. Sorry I don't have any pictures of the assembly. I have included a diagram below of how we assembled it.

Here are pictures of the headboard after I put the stain on. I used a bristle brush to apply the stain. I stained everything except the back.

Here are pictures of the back after we attached the lamps. We ran into a problem......the screws that came with the lamps were too long and we had to use several washers.......as you can see!

Here are pictures of where we attached the metal bed frame and lamps. I really wanted a different style of lamp, but like I've said before sometimes a girl has to take what she can get. I wanted a lantern style lamp, but there were concerns about the combination of glass and an 8 year old boy! I could only see them getting broke after something goes sailing across the room! Then comes a visit to the ER and stitches. So we chose the safer route. It still turned out nice!

Here are the exact dimensions:
Top 3/4 x 3 1/2 x 63
Door 36 x 58
Each side is (2) 2x4x60
So here is how we assembled the headboard:
1) First we cut all the 2x4 to 60" lengths, then we glued them together in a "L" shape. The small 2" side up against the larger 4" side. My husband also screwed in screws at an angle on the inside of the 2x4 on the front to help secure it to the 2x4 on the side.
2) We purchased a standard 36" wide door and cut it down to 58". The top of the door has a piece of wood on the inside, so we were ok with attaching that end, but the other end that we cut was hollow. So my husband looked around and found a piece of wood that we glued to the inside of the hollow end of the door. We used wood glue and screws to attach it to the sides.
3) Next we glued the top piece on and gave the sides and top a good sanding.
4) After the stain was applied and dry we decided where we wanted the lamps and drilled holes for the cords and screws. After the lamps were assembled and attached we held the bed up to the frame and marked where the screws would need to be. My husband drilled holes and attached the headboard to the frame.

$30-$40 Mantle Shelf
Here is a post that I posted on my Photography blog about a week ago, before I decided to start my DIY blog.

Here is my latest DIY project. If you don't already know my family recently made a huge move. We moved 9 hours away! Yea, you said it....WOW.....WHAT! We moved from Tennessee to Illinois. The land of SNOW!! My husband has forbid me to leave the house today and tomorrow. Currently as I set here typing this post it is -12 and feels like -37!! School has been called off today and tomorrow for my son.....I'm soooo glad!! We have at least 10" of snow, I had to shovel out a path of snow in my back yard for the dog.......it is too deep....he has to try to hop. It's so funny to watch him.

Anyway back to the project our house has a fireplace in the corner and no mantle. We moved for my husband's job and because we weren't sure if we were going to stay up here or move back to TN we decided to lease a house and not buy just yet. Since we are leasing I needed something that could be taken down. Since I am on a budget and I wanted something not permanent I choose to build one myself. I drove my happy little hiney down to my local Lowe's to pick up all the needed supplies. The total cost will be between $30 - $40 depending on what type of shelf brackets, type of wood you choose. Also if you have wood screws and paint at home. I bought two cans of white spray paint....the cheap kind. Like 98 cents a can. Let me tell you don't waste your two bucks. Instead of driving my not so happy, but tired hiney back to the store I used some flat white paint I had left. I really wanted a shine on it, but a girl has to take what she can get. I was impatient and wanted up on the wall. I choose to paint and not stain because I figured that would be more versatile. I could take it down and use it somewhere else if I wanted to.
I used the 1x10x6 for the piece that will be up against the wall and the 1x8x6 for the top piece. I pre drilled all the holes and counter sink each. I used the shelf brackets to help hold everything up while I drilled the holes. After it was all assembled I painted it white. I marked the wall where I wanted the shelf (top of shelf 60in from the floor) and where the studs were. In a weird kind-of way I held it up on the wall all by myself and pre drilled through the wood into the wall and stud. I put it back down on the floor and used a larger drill bit (the size of the top of the screw). I only drilled deep enough to counter sink the screws. I put plugs in the holes. I didn't glue them because I wanted to get to the screws if I needed to take the shelf down. I touched them up with white paint.
While I was putting up Christmas decorations I realized that I hadn't take a close up of it, so I snapped one quickly. If you are wondering.......yes that is a curtain rod that the stocking are hanging on. Since Christmas is over and all decorations are down and stored away til next year. It only has a few thing on it. I'm still deciding on how to decorate it. I'm open to suggestions, please leave me comments. I'll post a picture when I finally get it all done!!
Subscribe to:
Posts (Atom)